How to verify your ITR using Aadhaar
Aadhaar Card is an important piece of document that serves as a proof of identification. From passport, to getting a driving license (DL), from opening a bank account to disbursing provident funds to getting subsidies under various governmental schemes, it has a host of different uses in the country. In addition to all these, Aadhaar can also be used for e-verifying Income Tax Return (ITR). So, here we have detailed a step-by-step guide that will help you file your ITR using Aadhaar. Also Read - How to get Aadhaar PVC card for whole family in simple steps
How to e-verify your Income Tax Returns (ITR) using Aadhaar
In order to be able to use your Aadhaar card to verify your ITR, you need to ensure that your Aadhaar card is linked with your PAN card. If you haven’t done that already, here’s what you need to do: Also Read - Here's how you can lock Aadhaar biometric data online
Step 1: Open Income Tax department’s e-filing portal (incometax.gov.in/iec/foportal). Also Read - Aadhaar Card name, address update: List of documents that can be used as Proof of Address
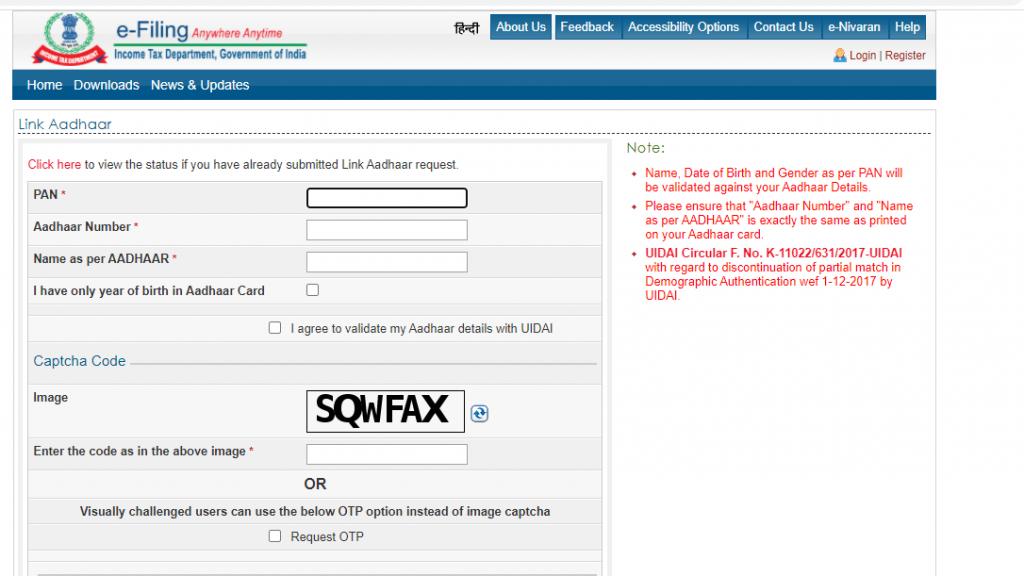
Step 2: In the Quick Links section of the page, click on the ‘Link Aadhaar’ option.
Step 3: On the page that follows, enter your PAN number, Aadhaar number, your name as is mentioned on your Aadhaar card, and your registered mobile number. Check all the boxes and click on the ‘Link Aadhaar’ button.

Once your Aadhaar has been linked with your PAN, here’s what you need to do to e-verify your ITR using Aadhaar:
Step 4: Go to the Income Tax Department’s e-filing portal and click on the ‘e-Verify Return’ option.
Step 5: Enter your PAN, assessment year, acknowledgement number received at the time of ITR filing and mobile number and then Click on the Continue button.
Step 6: Follow the prompts on the screen and at the end, a web page will display the details of the uploaded returns.
Step 7: Now, click e-verify on this page to start the ITR e-verification process.
Step 8: Here you will see various methods that you can use to generate the e-verification code (EVC). The list includes net banking, a pre-validated bank account, pre-validated demat account, Digital Signature Certificate or Aadhaar. Click on the Aadhaar option.
Step 9: A one-time password (OTP) will be sent to the mobile number linked to your Aadhaar card. Enter the OTP to e-verify your return and hit the Submit button.
Once you have submitted the OTP, you will get a confirmation message, which says, “Return successfully e-Verified. Download the Acknowledgement.” This confirmation message will also be sent to you on your registered email ID.
For the latest tech news across the world, latest PC and Mobile games, tips & tricks, top-notch gadget reviews of most exciting releases follow BGR India’s Facebook, Twitter, subscribe our YouTube Channel. Also follow us onFacebook Messenger for latest updates.Trending Today
NewsUnion Budget 2021 to Twitter accounts banned: Today's top tech newsNewsRealme X7 series India launch to Carl Pei's new venture Nothing: Top tech news todayAppsWhatsApp brings Always Mute group chats to iOS, AndroidNewsNokia 5.3 launching in India in August with two more phones- Prev
- Next


