How-To: Using Zwift and TrainerRoad Concurrently | DC Rainmaker
For many of you more tech-focused folks, this quick how-to guide will be old hat to you. However, as was made abundantly clear to me a few days ago when I posted a picture on my Instagram stories of me doing a trainer ride with Zwift and TrainerRoad concurrently – a lot of folks don’t realize you can.
The main reason most people want to do this is to get the better-structured workouts from TrainerRoad, while still having the social elements on Zwift. Or also, continuing to get ‘credit’ for the workouts in Zwift to move up levels.
There are many ways to do this, depending on what gear you have lying around, and what you use to normally run Zwift/TrainerRoad. At one end of the spectrum, you can use entirely different computers/tablets/phones, and at the other end, you can run both apps on a single iPad or computer concurrently.
In this guide, I’m going to cover the three core scenarios, depending on what kind of ‘device’ you have (e.g. iPad, computer, Apple TV, phone, etc…), though there are a number of variants of this for more geeky folks – but these are likely to be the most popular:
Option A: Two separate devices, with at least one having an ANT+ USB stickOption B: Two separate devices, using only Bluetooth SmartOption C: One iPad, using only Bluetooth Smart
Additionally, you can also do this on a single laptop/computer with either an ANT+ stick, or if using a KICKR18/20/CORE/BIKE, then all via Bluetooth Smart. For that you can just follow either Option A or Option B, but then just resize the windows to your liking.
With that, let’s dive into it.
Option A: Two Screens, one via ANT+
Note: This method also works for one laptop/desktop as well, assuming you resize the windows appropriately.
In this scenario, you’re going to run Zwift and TrainerRoad on two different devices, and one of them supports ANT+. So my assumption is that one of them is a PC or Mac, with an ANT+ USB stick. And the other can be whatever you want it to be (tablet/iPad/Apple TV/phone/computer).
(If you have a KICKR 18/20/CORE/BIKE, you can ignore the Bluetooth limitations, as they don’t apply to you, just ignore the words ANT+ and choose Bluetooth instead)
To keep things simple, we’re going to use TrainerRoad on the computer with the ANT+ USB stick, and then the other device for Zwift (technically it doesn’t matter which way you do it, but I’m gonna keep things simpler and do it this way). To get started, ensure that you’ve got Zwift and TrainerRoad installed, and you can use either device solo-style if you wanted to. Basically, before we get all fancy – make sure it just works normally.
A) TrainerRoad installed on the first device with ANT+, and able to use like normalB) Zwift installed on the other device, and able to use like normal
Now, go ahead and crack open TrainerRoad first, and then ensure your smart trainer is paired as an ANT+ controllable trainer. The key here is that you’re using ANT+ (again, if you’re using a KICKR18/20/CORE/BIKE, you can instead just use Bluetooth). The controllable icon is the one that has the little trainer, versus just a lighting bolt is a power meter source. And, most importantly, it has the ANT+ logo and not the Bluetooth Logo.
Also, ensure that your heart rate strap/sensor is paired via ANT+ as well, unless you have a dual-capable strap (see next section on that).
Now’s a good time to go ahead and pick out your workout (be it from the calendar, TrainNow, etc…), and having that all ready, so that ultimately, you’re at this page, ready to start:
Next, go and open up Zwift. Here, you’ll pair up your trainer or power meter in the “power meter” section.
But NOT the “Controllable” section, which should be empty/unpaired (like below). If you pair that, the two apps will fight and ruin your workout. Repeat after me: The controllable trainers section of Zwift needs to be empty, if it’s not, you will fail. And fail hard you will.
Now because we used ANT+ on the TrainerRoad one, it doesn’t matter if we use Bluetooth Smart or ANT+ here on Zwift if you have both. But ensure that your power source is your trainer.
The same is true for the heart rate strap, but in this case I was using the Polar H10 – so it’s dual-channel. But here’s where you could pair your watch, if you don’t have a dual-strap. Most newer watches support this, usually in what’s called “Broadcast Mode”. Though for this particular item, we need it to support broadcasting over Bluetooth Smart (whereas older Garmin watches only support broadcasting over ANT+). More on that in this post.
Once that’s set, go ahead and pick your world/route in Zwift that you want to ride, and tap ‘Ride’ when ready.
Now, all you need to do is just start the TrainerRoad workout and then start pedaling. Both screens will record your workout just fine and the TrainerRoad session will be the one controlling your smart trainer through the intervals. Once you get to the end of it, you can save both workouts, and then later in Strava, decide which one is your keeper.
Option B: Two Screens, All via Bluetooth
Now for this next option, you’re using two devices that don’t support ANT+. For example, two iPads, or two computers without ANT+, or an Apple TV, or phones without ANT+. It doesn’t really matter. They don’t need to be the same, you can have one Apple TV and one Mac, or one Windows computer and one iPad. Whatever you want, it’s Bluetooth all the way.
First, you’ve got three options to make this work on the trainer side:
Options A & B require nothing else, assuming you have either a Wahoo trainer or a power meter. Whereas option C requires purchase of hardware.
Meanwhile, for the heart rate side, you’ll need a heart rate strap that does dual two-channel Bluetooth Smart connectivity, OR, a watch that broadcasts your heart rate via Bluetooth Smart (most recent Garmin & Polar watches) in conjunction with a regular non-dual strap. They are:
Ok, I know that sounds like a lot, but if you happen to have the right hardware, then that’s the majority of the battle. With that all set, ensure you’ve got two things done:
A) Zwift installed on your first device, and able to use like normalB) TrainerRoad installed your second device, and able to use like normal
Now, go ahead and crack open TrainerRoad first, and then ensure your smart trainer is paired as a controllable trainer (assuming you care about that, which, I’d hope you do). That’s the default of course, but you want to do that first. This means it should have the little wheel/trainer icon. And you can see it also has the Bluetooth icon.
I’d also recommend going and picking out your workout (be it from the calendar, TrainNow, etc…), and having that all ready, so that ultimately, you’re at this page, ready to start:

Next, go and open up Zwift. Here, you’ll pair up a power meter – but NOT the smart trainer section. That should be empty/unpaired. If you pair that, the two apps will fight like toddlers, and true to real life, the only person that loses is you. So if you’ve got a Wahoo KICKR, you can select your KICKR in the ‘Power Sources’ pairing menu.
But, if you’re like me and was riding on any other trainer (I was on a Tacx NEO 1 for this ride), then you’ll need to select some other power meter source, or have an NPE CABLE to broadcast a copy of the trainer’s power. This is because all other trainers only can pair a single Bluetooth Smart channel, and we’ve already used up that channel in TrainerRoad.
So in my case, for this go-around I’m choosing my Quarq power meter:
Remember, you *MUST* have the “CONTROLLABLE” section empty below:
The same is true for the heart rate strap, but in this case I was using the Polar H10 – so it’s dual-channel. But here’s where you could pair your watch, if you don’t have a dual-strap. Most newer watches support this, usually in what’s called “Broadcast Mode”. Though for this particular item, we need it to support broadcasting over Bluetooth Smart (whereas older Garmin watches only support broadcasting over ANT+). More on that in this post.
Once that’s set, go ahead and pick your world/route in Zwift that you want to ride, and tap ‘Ride’ when ready.
Now, at this point simply start the TrainerRoad workout, and you’re off, easy! Zwift will automatically start recording as you pedal and TrainerRoad will be controlling your trainer.
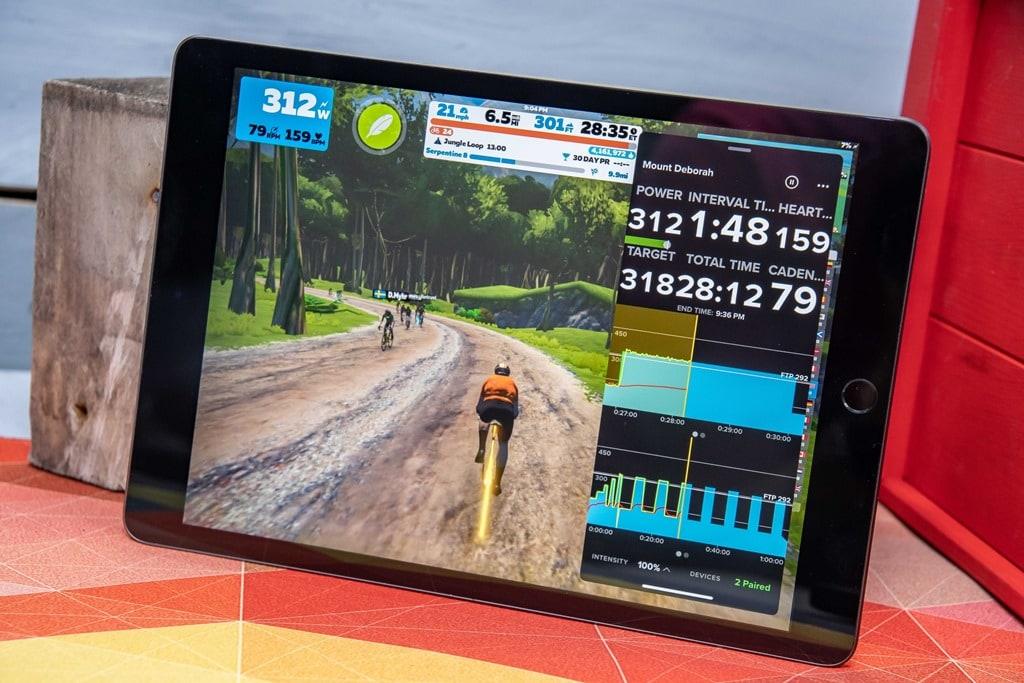
Option C: A Single iPad
Now for this next option, depending on your trainer/bike setup, you can actually use both apps at the same time on an iPad. I say ‘depending’, because all trainers except the newer Wahoo KICKR units (KICKR18/20/CORE/BIKE), only broadcast one concurrent Bluetooth Smart channel. Meaning, once one app (e.g. TrainerRoad) connects to it, it’ll block out any further connections (meaning, Zwift then can’t see it). Of course, for dual machines where one is using ANT+, it’s not an issue. But since the iPad doesn’t support ANT+, it’s an issue. The same is also true for your heart rate sensor/strap too, it needs to be dual-capable.
Thus, you’ve got three options to make this work on the trainer side:
Options A & B require nothing else, assuming you have either a Wahoo trainer or a power meter. Whereas option C requires purchase of hardware.
Meanwhile, for the heart rate side, you’ll need a heart rate strap that does dual two-channel Bluetooth Smart connectivity, OR, a watch that broadcasts your heart rate via Bluetooth Smart (most recent Garmin & Polar watches) in conjunction with a regular non-dual strap. They are:
Ok, I know that sounds like a lot, but if you happen to have the right hardware, then that’s the majority of the battle. The rest from here on out is just tapping a few things on the screen.
With that all set, ensure you’ve got two things done:
A) Zwift installed, and able to use like normalB) TrainerRoad installed, and able to use like normal
Now, go ahead and crack open TrainerRoad first, and then ensure your smart trainer is paired as a controllable trainer (assuming you care about that, which I’d hope you do). That’s the default of course, but you want to do that first.
I’d also recommend going and picking out your workout (be it from the calendar, TrainNow, etc…), and having that all ready, so that ultimately, you’re at this page, ready to start:
Next, go and open up Zwift. Here, you’ll pair up a power meter – but NOT the smart trainer section. That should be empty/unpaired. If you pair that, the two apps will fight like toddlers, and true to real life, the only person that loses is you. So if you’ve got a Wahoo KICKR, you can select your KICKR in the ‘Power Source section.
But, if you’re like me and was riding on any other trainer (I was on a Tacx NEO 2 for this ride), then you’ll need to select some other power meter source, or have an NPE CABLE to broadcast a copy of the trainer’s power. This is because all other trainers only can pair a single Bluetooth Smart channel, and we’ve already used up that channel in TrainerRoad.
You can see below that I connected up my Stages power meter to both the “Power Source” and “Cadence” options, and the “Controllable” option is blank. This needs to be blank. I repeat again, this needs to be blank.
In the case of my heart rate, I was using the Polar H10 – so it’s dual-channel. But here’s where you could pair your watch, if you don’t have a dual-strap. Most newer watches support this, usually in what’s called “Broadcast Mode”. Though for this particular item, we need it to support broadcasting over Bluetooth Smart (whereas older Garmin watches only support broadcasting over ANT+). More on that in this post.
Now, here’s where the magic happens. While Zwift is open, on the iPad, you’ll swipe up from the bottom, which should show you this:
Sometimes, the swipe-up is finicky, so it may take a couple of tries till you get the hang of it.
Once it shows you that lower bar, you’ll see TrainerRoad listed there. Long-hold on the TrainerRoad icon, and then drag it up over Zwift. Effectively, long-hold and drag it to where the Zwift leaderboard would be:
And boom, you’re done:
You can theoretically move this around and such, but in practice (especially once your fingers are wet), I find this darn near impossible to do.
Once that’s set, go ahead and pick your world/route in Zwift that you want to ride, and tap ‘Ride’ when ready. And then at this point you can tap to start your TrainerRoad session, and then your Zwift dude/dudette will automatically start pedaling as well. TrainerRoad will be controlling the smart trainer’s intervals, while Zwift is just along for the ride. Easy!
It’s easy! Note that because you’ll have both apps open, it may burn a bit more battery than normal. Certainly, Zwift already burns iPad battery like a buzz saw, but this doesn’t help. So don’t be like me last night and start your 1hr long session with 10% battery. You can always plug it in too. Oh, and if you want a video version of the iPad instructions, Tariq from SmartBikeTrainers has this outlined here as well.
–
In any case, I’m sure you’ll have plenty of questions, so I’ll sort them into an FAQ once things get rolling. With that – go forth and get ahead of the game, it’ll be like you’re from the future Zwift Premium.
Thanks for reading!
Found This Post Useful? Support The Site!
At the end of the day, I’m an athlete just like you looking for the most detail possible on a new purchase. These posts generally take a lot of time to put together, so if you're shopping for the Polar H10, Garmin HRM-DUAL or ANT+ USB Adapter with 3M cable/stand or any other accessory items, please consider using the affiliate links below! As an Amazon Associate I earn from qualifying purchases. It doesn’t cost you anything extra, but your purchases help support this website a lot. Even more, if you use Backcountry.com or Competitive Cyclist with coupon code DCRAINMAKER, first time users save 15% on applicable products!
Polar H10
Amazon $79 REI $90 Wiggle 79 €Garmin HRM-DUAL
Amazon $55 REI $70 Wiggle 57 €ANT+ USB Adapter with 3M cable/stand
Amazon $20And of course – you can always sign-up to be a DCR Supporter!That gets you an ad-free DCR, access to the DCR Quarantine Corner video series packed with behind the scenes tidbits...and it also makes you awesome. And being awesome is what it’s all about!
ShareTweetShare0 Shares- Prev
- Next


