XDA Basics: How to take Scrolling Screenshots on an iPhone
If you want to save the contents of the screen on your device, taking a screenshot is one of the best and easiest options. However, if the content is spread across multiple lines or sections vertically, like this article, for example, you’ll have to take multiple screenshots to capture the entire information. This is where scrolling screenshots come in handy. A scrolling screenshot, as the name suggests, lets you scroll down on any page and capture screenshots of every section. It then stitches all of those screenshots into one single image. A lot of Android OEMs have scrolling screenshots as a built-in feature on their custom UIs. In fact, Android 12 has the ability to take scrolling screenshots baked in (though it is not enabled by default for now).
On the iOS side of things, Apple introduced the ability to take scrolling screenshots natively on iPhone but it isn’t as straightforward as Android. It doesn’t work on all applications, you can’t store that screenshot in your gallery, and iOS 15 doesn’t make it any better either. However, it works well and should get the job done for most people. If it doesn’t, we also have a third-party app recommendation you can use to take scrolling screenshots.
Scrolling Screenshots on iPhone using Default Method
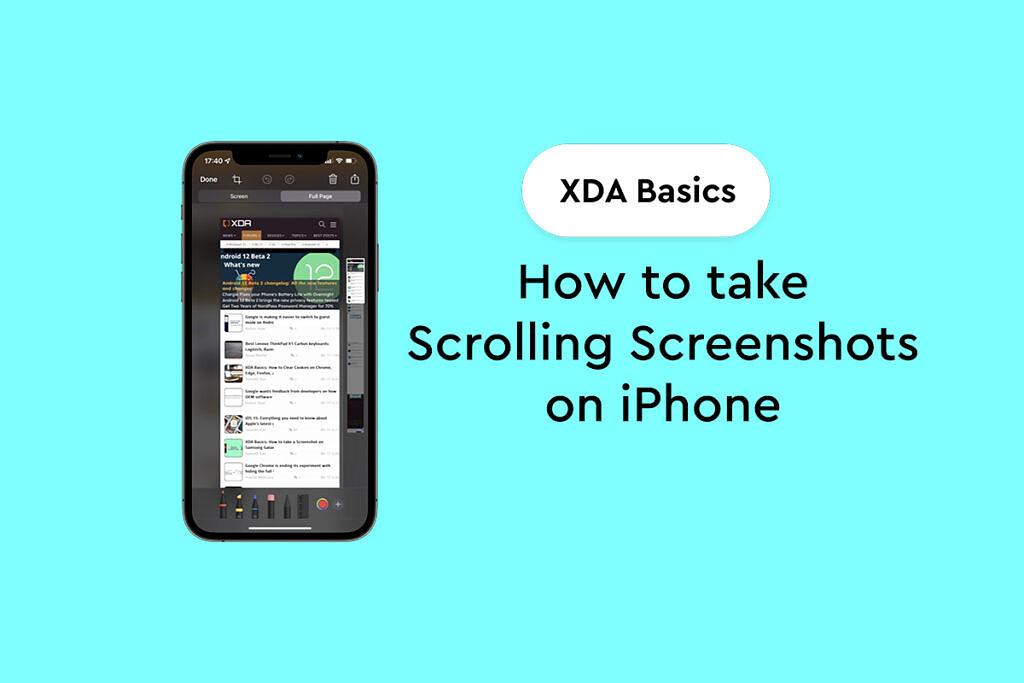
As we mentioned earlier, if you have an iPhone running iOS 13 or later, you have the option to take scrolling screenshots built into the UI itself. A lot of users may not have noticed this option in the screenshot menu since it’s not very self-explanatory, but we’ll tell you how to use it today. Note that this option is not available in all apps and is supported mainly in Safari and other first-party apps from Apple.

While this is the simplest way to take a scrolling screenshot on an iPhone, the fact it doesn’t let you save it as an image but only as a PDF can be a hassle. A workaround to this problem would be to use a PDF to JPG converter to convert the screenshot into an image and download it to the Photos app on your iPhone. If you don’t want to do that, you can use third-party apps to stitch screenshots together and form a scrolling screenshot. Let’s see how you can do that.
Scrolling Screenshots on iPhone using Picsew
Picsew is a third-party app that allows you to stitch multiple normal screenshots into a single long screenshot, similar to what a scrolling screenshot would look like. It is free, simple to use, and gets the job done perfectly well. Also, it saves the screenshot as an image and not a PDF which is a lot more convenient.
There are no restrictions to using Picsew and it works for screenshots taken across the device, and in all apps, so if you’re not using a first-party app, this is the only way to capture a scrolling screenshot on an iPhone. Here’s how you can use Picsew to stitch together multiple screenshots.
If you want to automate the process of cropping and stitching the screenshots or want an additional feature in the form of scrolling screenshots by recording your screen, you can buy the Pro version of Picsew for around $2 which can be worth it if you’re going to use the feature frequently.
This is how you take scrolling screenshots on an iPhone. It surely isn’t as straightforward as on Android, but you can use these workarounds to make it happen. Hopefully, with future versions of iOS, Apple will include a more advanced screenshot tool that can let users take scrolling screenshots on all apps across iOS as well as allow them to save the screenshots as images instead of PDFs.
- Prev
- Next


